 AGreenNest
DIY Plant Projects
Build a Self-Watering Planter from Two Pots
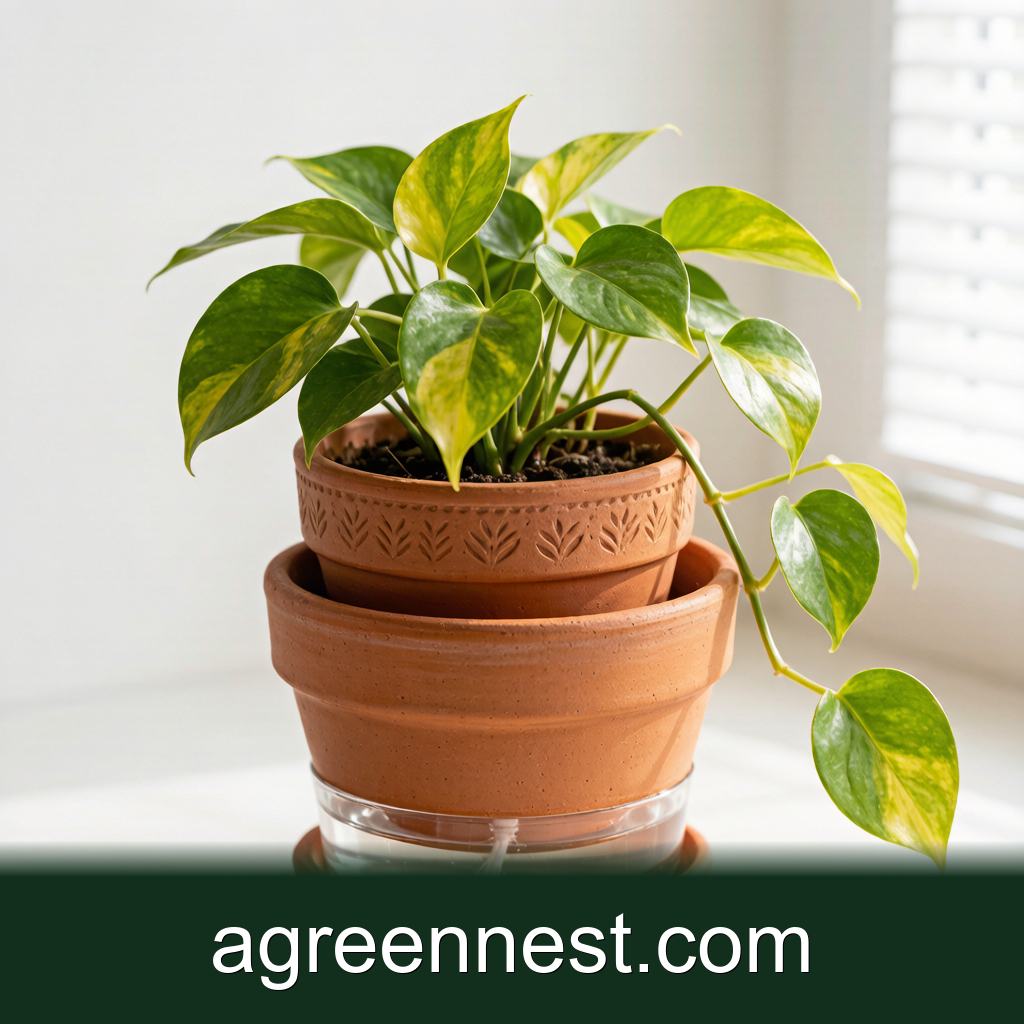
Last March I left for a nine-day trip and came home to a crispy basil and a Dracaena that had flopped like a spent umbrella. The timer on the grow light had worked. The watering had not, because there was no one to do it. That trip is why I now keep a row of self-watering pots on the kitchen counter, and why you can build one in about twenty minutes with things already in your shed.
This is the two-pot wick method. No electricity, no floating sensors, no app. Just a reservoir below the soil that feeds moisture up through a cord as the plant drinks. A well-built one keeps a medium houseplant happy for 10 to 14 days unattended, which is long enough to forgive a forgetful week.
What you need
- Two terracotta pots, one about 18cm diameter and one about 14cm (the smaller sits inside the larger)
- A plastic bottle or a short length of 2.5cm PVC pipe for the fill tube
- A length of cotton clothesline or braided nylon wick, roughly 40cm
- A saucer or a piece of broken pot to lift the inner pot off the bottom
- Standard potting mix plus a handful of perlite
- A drill or a nail heated over a flame to make one hole in the base of the small pot
The terracotta matters. Plastic works, but unglazed clay breathes and is far more forgiving if you overfill the reservoir. If you only have plastic, use less water in the base and check it for a week before you trust it.
How the reservoir works
The small pot holds the plant and the soil. The large pot holds a few centimetres of water at the bottom. The wick runs from the reservoir, up through the drainage hole, and into the soil. As the top of the soil dries, capillary action pulls water up the cord and into the root zone. The plant takes what it needs, and the reservoir refills the gap. It is the same principle as the commercial self-watering pots, just built by hand for a fraction of the price.
The trap most first builds fall into is making the wick too short. If the cord does not actually sit in the standing water at the bottom, nothing moves. It has to reach all the way down past the lift platform.
Step 1: Open the inner pot
Drill or melt one 6mm hole dead center in the base of the 14cm pot if it does not already have one. Standard terracotta usually has a single drainage hole already, which is fine. Run the wick through so about 8cm hangs below the pot and the rest lies across the inside of the base. Weigh the cord down with a small stone so it stays put while you fill.
Step 2: Build the fill tube
Cut the bottle neck or PVC to about 10cm and push it through the soil at the edge of the inner pot, angled so the open end reaches near the bottom of the outer pot. This is your telltale and your funnel. Pour water in through it and you know exactly where it lands, and you can see the level by peering down the tube. Skip this and you will be dumping water blindly into the soil and never knowing if the reservoir is full or empty.
Step 3: Set the inner pot above the water
Place the broken-saucer shard or three small feet in the base of the 18cm pot, then lower the 14cm pot in so its rim sits about 2cm below the rim of the larger one. The gap below is your reservoir. The wick now dangles into that gap. Pour 300 to 500ml of water into the fill tube and watch the bottom of the wick darken as it wets. If the cord stays dry, it is not reaching the water and you need to lengthen it.
Step 4: Fill and plant
Use a mix of two parts potting soil to one part perlite so the moisture moves freely and the roots do not drown. Plant as normal, then settle the soil with a gentle watering from the top so the column is fully wet on day one. From here the reservoir takes over. A plant that likes even moisture, such as a Golden Pothos or a kitchen herb, is the ideal first tenant.
Step 5: Prime and test before you trust it
Run the planter for a week with a plant you would not cry over. Lift the inner pot daily. On day one it should feel heavy and stay heavy for several days, then lose weight as the reservoir drains. If it is light by day two, your wick is not wicking and you should re-seat it. Once you see the weight hold steady for five or six days, the build is sound.
What to grow, and what to avoid
Best candidates are plants that hate drying out completely: herbs like basil and parsley, Spathiphyllum (peace lily), Epipremnum types, and ferns. The steady moisture suits them.
Do not use this for succulents or cacti. A gritty succulent mix plus a reservoir is a rot recipe, because those plants want the soil to go bone dry between drinks. Cactus in a self-waterer is a slow death, not a convenience.
Common problems and fixes
- Soil stays wet on top but plant wilts: the wick is moving water but the mix is too dense. Add more perlite and ease off the top watering.
- Reservoir empties in two days: the pot is too small for the plant or the room is hot. Move to a larger outer pot or top up more often.
- Green scum in the base: algae. It is harmless to the plant but means light is hitting the water. Wrap the outer pot in a sleeve of fabric or move it out of direct sun. The algae-in-hydroponics notes cover the same fight in a different setup.
Frequently Asked Questions
Q: How long can a plant survive on the reservoir alone?
A:
For a medium pothos or herb in a 14cm pot, 10 to 14 days in normal room conditions. In a hot, dry room it is closer to a week, so test your own setup before a long trip.
Q: Can I use a plastic pot instead of terracotta?
A:
Yes, but plastic holds no spare moisture in its walls and shows overwatering faster. Use a smaller reservoir, about 200ml, until you learn the plant's pace.
Q: Do I still water from the top at all?
A:
Only to flush salts every three or four weeks. Pour through until water runs from the fill tube, then let it rebalance. Constant top watering defeats the purpose.
Q: My wick went moldy at the soil end. Is that a problem?
A:
A little fuzz is normal and harmless. If it is thick and smells, the soil is too wet. Pull it, trim the moldy part, and let the top dry before refitting.
Q: Will this work for a big floor plant?
A:
Not this exact build. Scale up by using a 25cm inner pot and a deeper outer pot, and run two wicks instead of one so the column stays evenly moist.
The two-pot wick planter is the cheapest insurance against a dead plant after a holiday, and it teaches you more about how water actually moves through soil than any chart. Build one this weekend, test it on a pothos, and keep the self-watering pot buyers guide handy for the day you want something prettier than terracotta on the shelf.
Recommended Tools for DIY Plant Projects Care
Free, no-signup helpers matched to this guide.
Free Ebooks to Explore
Downloadable handbooks — no email required.
Free Ebook
The AGreenNest Succulent Care Handbook
The complete, beginner-to-confident guide to growing fat, happy succulents — 10 chapters and a 20-plant directory.
Free Ebook
Haworthia & Haworthiopsis Care Handbook
A focused guide to the striped, forgiving Haworthia clan.
Join the Conversation
Have a tip or a question about Build a Self-Watering Planter from Two Pots? Share it below — comments are saved on our server.