 AGreenNest
DIY Plant Projects
Build a Wall Planter for Live Plants
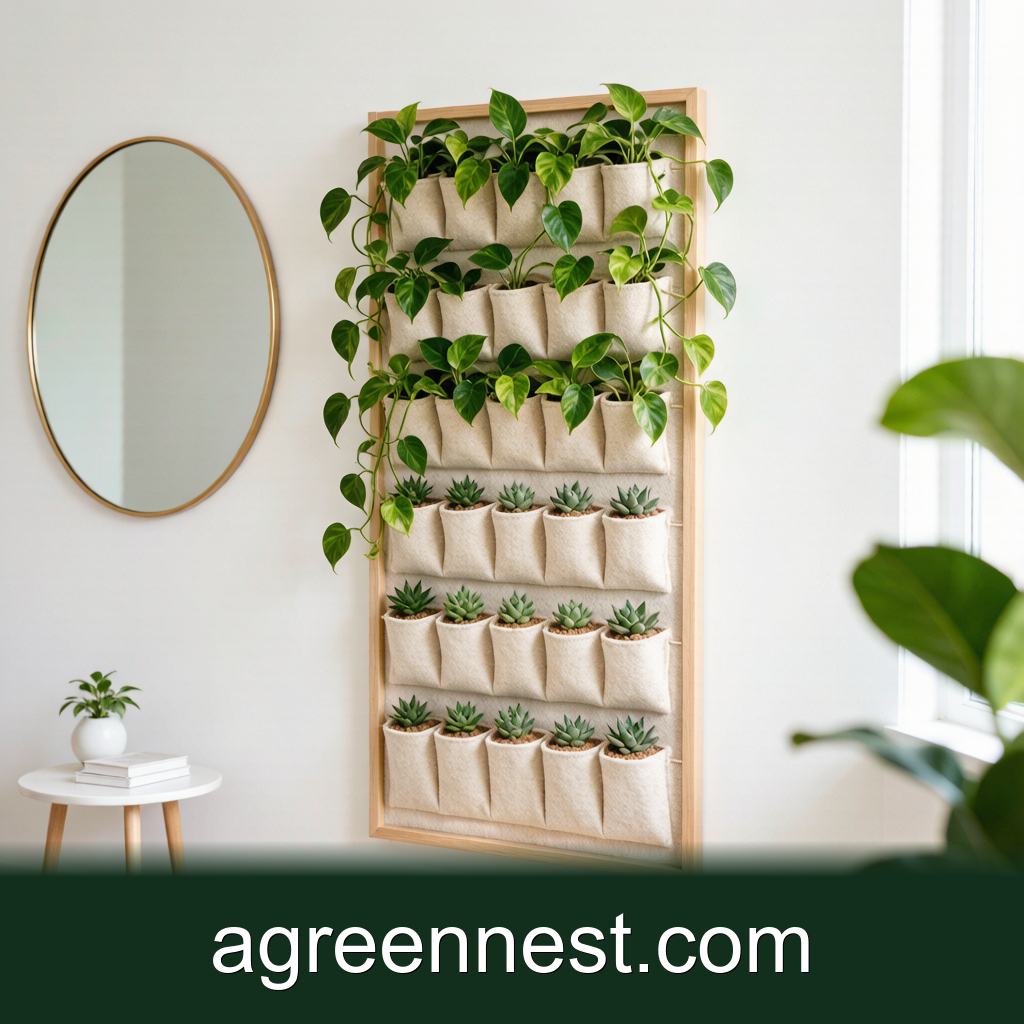
Build a living wall with a wooden frame, a backing board, and rows of landscape-fabric pockets stapled into channels. Fill each pocket with a light succulent or houseplant mix, plant trailers at the top and uprights below, and water by hand or a slow drip line. Hang it on a wall that gets 4 to 6 hours of bright indirect light.
The blank wall beside the desk had been staring at me for months. A framed print felt lazy, so I built a living wall instead, a grid of planted pockets that sits flat against the plaster and turns dead space into the greenest thing in the room. You do not need power tools beyond a drill and a staple gun, and the whole thing hangs from two screws.
What you need before you start
Gather the materials so the build does not stall halfway through.
- One wooden frame, about 60cm wide by 90cm tall, made from 2x4cm pine.
- A backing board of 6mm plywood cut to fit inside the frame.
- Landscape fabric, the woven kind used for garden beds, roughly 70cm by 100cm.
- A staple gun and 10mm staples.
- A length of 13mm irrigation tubing and a drip emitter, or just a jug for hand watering.
- A light potting mix; for the pocket plants I used a succulent blend thinned with extra perlite.
- Four small plants per pocket row: trailers like Epipremnum up top, compact uprights like Peperomia below.
Total spend sits around 30 dollars if you already own a drill, and the frame can be any size that fits your wall.
Step 1: Build and sand the frame
Cut four lengths of pine and join them into a rectangle with wood screws at the corners, then screw the plywood backing to the back so the frame reads as a shallow box. Sand the front edges so they are smooth to the touch, because the fabric will sit flush against them. If you want a cleaner look, paint or oil the wood now, before the fabric goes on, since you cannot reach it afterwards.
Step 2: Cut and fold the pocket rows
Lay the landscape fabric across the front of the frame and cut it about 5cm wider than the frame on every side. Mark three horizontal channels, one near the top, one in the middle, and one near the bottom, each about 18cm tall. These become the pockets your plants sit in. The fabric is the whole structure, so use the woven type that will not rot in damp soil for a season.
Step 3: Staple the pockets into shape
Fold the bottom edge of each channel up by 15cm and staple it to the frame at 4cm intervals, then staple the top edge of the channel to the frame above it. The fold forms a trough that holds soil, and the open top is where the plant goes in. Pull the fabric taut as you staple so the pockets do not sag when wet. Three rows gives you nine to twelve planting spots on a frame this size, enough for a real display without looking crowded.
Step 4: Fill and plant the pockets
Half fill each pocket with the light mix, tuck the plant roots in, and top up so the soil sits just below the fabric edge. Plant the trailers in the top row so they spill down over the lower pockets, and the uprights in the rows beneath. Water lightly as you go so the mix settles, then top up any pockets that sink. Do not pack the soil hard; these pockets drain through the fabric, and a loose mix keeps roots from sitting wet.
Step 5: Hang it and set the water line
Fix two screws into a wall stud and hang the frame so it sits level, with a tray or a towel below for the first few waterings while you learn its drip. Hand watering with a narrow spout works fine, but a slow drip line threaded along the top row saves you the weekly climb. If the spot is dim, add a grow light on a timer, because a wall planter in a dark corner drops its lower leaves within weeks.
Where Should I Hang the Living Wall?
Pick a wall with 4 to 6 hours of bright indirect light, or plan to light it. Bathrooms work if they get a window, because the humidity suits the trailers, but avoid a wall above a radiator that bakes the fabric dry. A stair landing or the end of a hallway is often the brightest unused wall in the house, and that is where mine went. Keep it away from where someone will brush past and crush a pocket.
What Plants Work Best in a Wall Planter?
Trailing plants in the top row do most of the visual work, because they soften the hard frame as they grow down. Epipremnum aureum, Pilea nummulariifolia, and small Sedum all behave. In the lower rows use compact, shallow rooted plants: Peperomia, small Sansevieria, or a young Haworthia. Skip anything that wants a deep pot or grows a heavy trunk, since the pockets are only 15cm deep. For small rooms this approach pairs well with small-space styling and floating shelves, which cover the same grow-up-not-out idea in a different form.
Frequently Asked Questions
How often do I water a fabric wall planter?
Roughly every 5 to 7 days in summer and every 10 to 14 days in winter, but feel the mix through the fabric. The pockets dry from the front, so they need more frequent, lighter drinks than a normal pot rather than one deep soak.
Will the landscape fabric rot or smell?
Woven landscape fabric lasts a season or two outdoors and far longer indoors. Rinse it before use and keep the mix from being soggy, and it stays clean. A sour smell means you overwatered, so let it dry out before the next drink.
Can I use this outdoors on a balcony?
Yes, in shade or morning sun only. Full sun bakes the fabric and cooks the shallow roots, and wind can tear the staples. A covered porch is the sweet spot, and the frame screws in the same way.
My lower pockets dry out faster than the top ones. Why?
Water wicks down and the bottom rows lose moisture through more fabric surface, so they often need a top-up between full waters. A drip line along the top row evens this out, or just give the lower pockets a little extra by hand.
How do I swap a dead plant without rebuilding the wall?
Lift the fabric lip, slide the root ball out, and tuck a new plant into the same pocket with fresh mix. The pockets are open by design, so individual plants are replaceable without touching the frame.
A framed felt-pocket wall turns the most ignored surface in a room into its greenest feature, and the build is forgiving enough for a first timer with a drill. Hang it where it catches light, plant trailers up top, and water lightly and often, and the wall fills in within a season. If you want the surrounding space to read as intentional rather than just busy, the home office corner guide shows how to balance a planted wall with the desk below it.
Recommended Tools for DIY Plant Projects Care
Free, no-signup helpers matched to this guide.
Free Ebooks to Explore
Downloadable handbooks — no email required.
Free Ebook
The AGreenNest Succulent Care Handbook
The complete, beginner-to-confident guide to growing fat, happy succulents — 10 chapters and a 20-plant directory.
Free Ebook
Haworthia & Haworthiopsis Care Handbook
A focused guide to the striped, forgiving Haworthia clan.
Sources & further reading
GreenNest authors research and write every guide independently. The external links below are reputable references we recommend for deeper reading — they are not the sources we copied from.
- Missouri Botanical Garden: Gardening resources — Missouri Botanical Garden
- RHS: Houseplant care — Royal Horticultural Society
Join the Conversation
Have a tip or a question about Build a Wall Planter for Live Plants? Share it below — comments are saved on our server.