 AGreenNest
DIY Plant Projects
Build a Propagation Box from a Plastic Tote
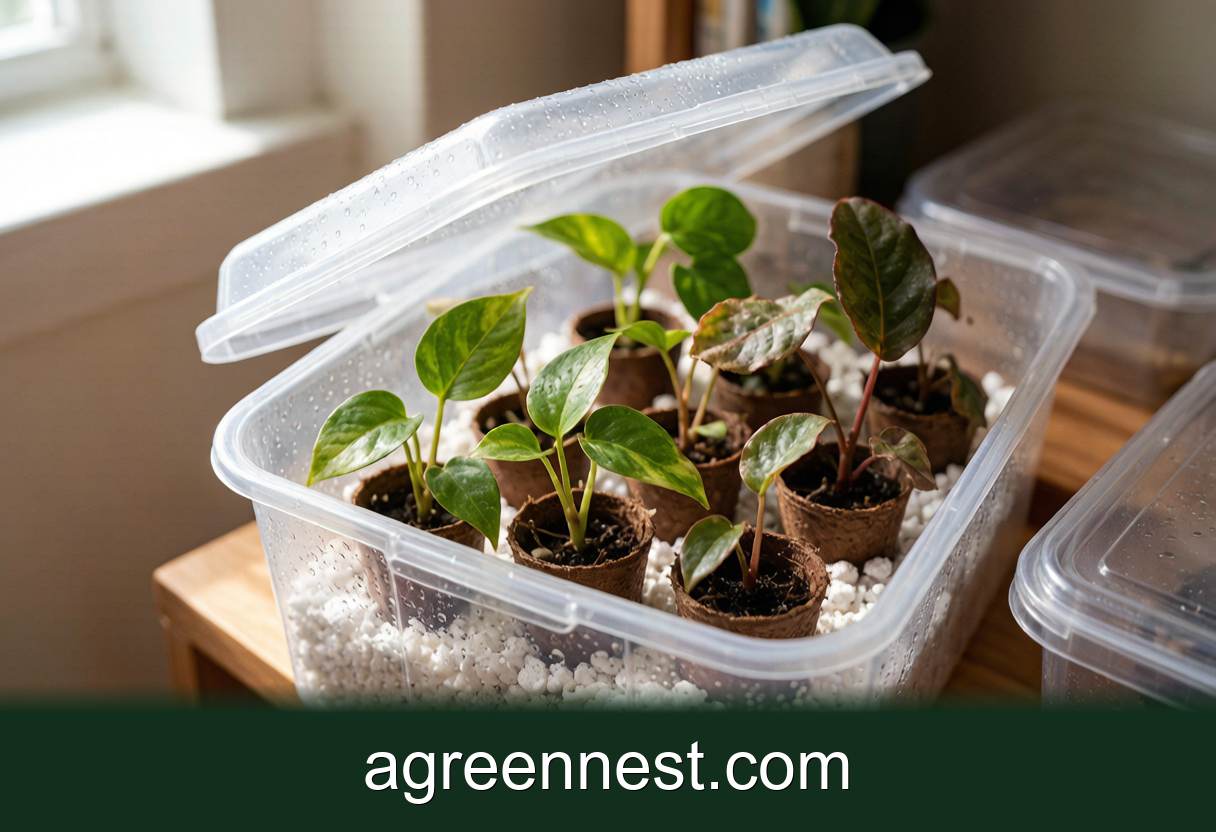
A sealed 30-liter clear tote holds 90 percent humidity and roots pothos, begonia, and rubber plant cuttings in two to three weeks instead of five on a dry windowsill. Drill six 6mm vents, add 5cm of damp perlite, and open the lid twice a week to keep mold out.
Every propagation guide tells you to tent your cuttings with a plastic bag. I did that for two years. The bags collapse onto the leaves, the clothespins fall off, and every third cutting rots where wet plastic touches it. Then I drilled six holes in a $9 storage tote, and my rooting success rate went from roughly 60 percent to over 90 across a full winter of cuttings.
Here is the exact build. One tote, one drill bit, one bag of perlite. About 20 minutes of work, and the box lasts for years.
Why Do Cuttings Root Faster in a Sealed Box?
A cutting has no roots, so it cannot replace the water its leaves lose. In a heated room at 40 percent relative humidity, an unrooted Begonia rex leaf loses moisture faster than the bare stem can wick it up, and the cutting spends its reserves just staying alive. Inside a closed tote the air sits at 85 to 95 percent humidity, water loss nearly stops, and the stem can put everything into root production instead.
In my box, Epipremnum aureum cuttings show 2cm roots in 12 to 16 days. The same cuttings in an open jar on the same shelf take 28 to 35 days, a pattern that matches our propagation station comparison. Semi-woody subjects like Ficus elastica benefit even more, because they root slowly and give a dry room weeks to punish them.
There is a catch: still, saturated air is also what gray mold wants. The venting schedule in step 5 is not optional. Skip it and you trade dried-out cuttings for fuzzy dead ones.
What You Need
- A clear plastic tote, 30 to 45 liters, with a lid that seats firmly. Clear, not translucent white; cloudy plastic cuts light by 30 percent or more.
- A drill with a 6mm (1/4 inch) bit
- Coarse perlite, enough for a 5cm base layer (about 4 liters for a 30L tote)
- A handful of small nursery pots or plastic cups with drainage holes punched
- A cheap hygrometer, the $8 kind, stuck to the inside wall
- Optional: a heat mat if your room runs below 18C in winter
Total cost lands between $15 and $25 if you already own a drill. No silicone, no hinges, no fan.
Step 1: Drill the Vents
Flip the lid over and drill six 6mm holes: four in the lid corners about 5cm in from each edge, and two in the upper third of the tote's short sides. Corner placement matters, because warm moist air pools at the edges and a centered hole vents less of it.
Six holes at 6mm held my box between 85 and 92 percent humidity at 20 to 22C. If your hygrometer reads over 95 for days and the walls run with drops, add two more holes. Under 80, tape one over. Drill slowly with light pressure; brittle totes crack if you lean on the bit.
Step 2: Lay the Perlite Base
Pour in a 5cm layer of coarse perlite and wet it until water just appears at the bottom, then tip the excess out. The perlite does three jobs: it holds a moisture reservoir that keeps humidity up for a week or more, it lifts pots away from any condensate pooling on the floor, and it drains instantly so nothing sits in stagnant water.
Damp perlite alone will carry the box for 7 to 10 days between top-ups. When it looks dry and rattles, add a cup of water down the side wall, not over the cuttings.
Step 3: Pot the Cuttings and Load the Box
Stick each cutting in its own small pot of barely damp mix: half perlite, half coco coir or seed compost works for almost everything soft-stemmed. Individual pots beat a communal tray, because one rotting cutting cannot infect its neighbours and you can pull a rooted one without disturbing the rest.
Space the pots so no leaves touch the walls or each other. Touching leaves in saturated air is where rot starts. A 30L tote holds 8 to 12 small pots comfortably; resist filling it to 20. If you are working with water-rooted cuttings instead, our jar garden build covers that route, and cuttings moved from water to soil settle in faster inside the box too.
Step 4: Position for Light and Warmth
Put the box where it gets bright indirect light: within 50cm of an east window, or 20 to 30cm under a small LED grow light running 12 hours on a timer. Never in direct sun. A sealed clear box in sunlight is a greenhouse in the worst sense, and interior temperatures can pass 40C in under an hour, cooking every cutting inside.
Rooting speed roughly doubles between 18C and 24C for most tropical houseplants, so aim for that range at the base of the cuttings. A heat mat under one half of the tote in a cold room gives you a gradient; if you are unsure what your shelf actually receives, run it past our free light calculator first.
Step 5: The Venting Routine That Prevents Mold
Twice a week, take the lid fully off for 15 to 20 minutes. This exchanges the air, wipes out the fungal spore buildup, and lightly hardens the cuttings. While the lid is off, check for any leaf that has gone translucent or brown and remove it with clean scissors, plus any fallen leaves on the perlite. Fallen material is mold fuel.
Wipe heavy condensation off the lid's underside during each venting; drips landing on the same leaf day after day cause localized rot. If gray fuzz appears despite venting, treat it the way our botrytis guide describes, and double the venting frequency for two weeks.
When Should Cuttings Come Out of the Box?
Check for roots at the two-week mark by tugging gently: resistance means roots. Once roots hit 2 to 3cm, start weaning. Crack the lid 2cm for three days, half-open for another three, then move the pot out entirely. A cutting yanked straight from 90 percent humidity to a 40 percent living room will wilt hard and sometimes drop every leaf it grew.
Rooted plants go on to normal care; the pebble humidity tray is a good halfway house for humidity lovers like ferns and Fittonia albivenis.
Frequently Asked Questions
Q: My tote walls are dripping wet every morning. Is that too much?
A: Yes. Constant running condensate means humidity is pinned near 100 percent. Add two more 6mm vents and shorten your top-up watering. A light fog on the walls is fine; streams are not.
Q: Can I root succulents or cacti in the box?
A: No. Succulent cuttings like Echeveria callus and root best in dry air and will rot within days at 90 percent humidity. The box is for tropicals: pothos, philodendron, begonia, ficus, hoya, peperomia.
Q: Do I need rooting hormone if I use a propagation box?
A: For soft cuttings like pothos, no measurable difference in my batches. For semi-woody stems like Ficus elastica or hoya, a 0.1% IBA powder shaved 4 to 6 days off rooting time. Cheap insurance on slow subjects.
Q: White fuzz appeared on the perlite but the cuttings look fine. Do I tear it all down?
A: Not yet. Scoop out the fuzzy patch plus 2cm around it, vent daily for a week, and reduce watering. Saprophytic mold on media is common and mostly harmless; act fast only if fuzz reaches a stem.
Q: Can I use the box outdoors in summer?
A: Only in full shade. Any direct sun on a sealed tote spikes the interior past safe temperatures within the hour. Indoors under controlled light is more predictable.
A propagation box is the rare project where the cheap version is genuinely the best version: a clear tote with six holes outperforms most glass cabinets I have tested for rooting speed, because the small volume holds humidity with no equipment. Build it once, and every free cutting your friends hand you becomes a plant. To figure out how long each species will take to root, check our propagation timeline tool.
Sources & further reading
GreenNest authors research and write every guide independently. The external links below are reputable references we recommend for deeper reading — they are not the sources we copied from.
- Michigan State University — College of Agriculture & Natural Resources — Michigan State University
- NC State Extension — Plant Toolbox — NC State Extension
- University of Minnesota Extension — U Minnesota Extension
Recommended Tools for DIY Plant Projects Care
Free, no-signup helpers matched to this guide.
Free Ebooks to Explore
Downloadable handbooks — no email required.
Free Ebook
The AGreenNest Succulent Care Handbook
The complete, beginner-to-confident guide to growing fat, happy succulents — 10 chapters and a 20-plant directory.
Free Ebook
Haworthia & Haworthiopsis Care Handbook
A focused guide to the striped, forgiving Haworthia clan.
Share Your Plant Story
Grown something tricky, or found a trick that finally worked? Tell us in the comments, or see what other readers are sharing on our Community page. The best reader tips get folded back into our guides.
Join the Conversation
Have a tip or a question about Build a Propagation Box from a Plastic Tote? Share it below — comments are saved on our server.